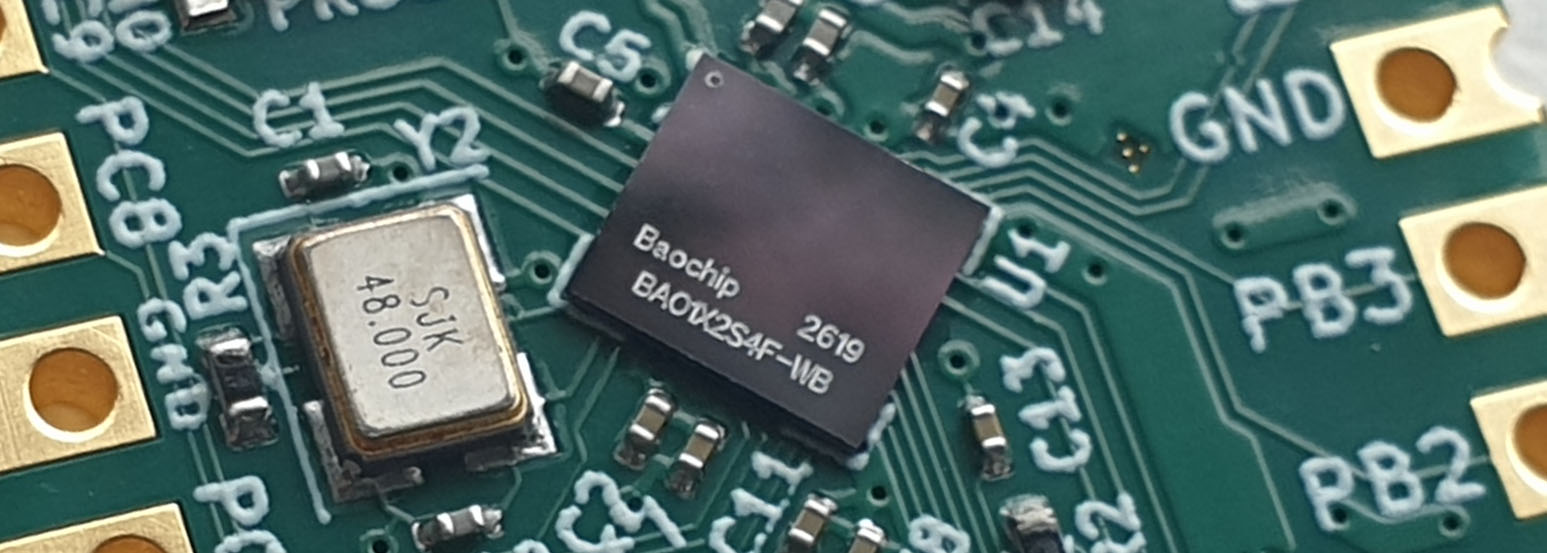
Introducing Baochip
bunnie | masto: @bunnie@treehouse.systems | bluesky: @bunnie.org
baochip | bluesky: @baochip.com
「日本語版(機械翻訳)」
Follow Along On-Line
https://baochip.com/dabao-intro/extended-ja.html
Introducing Baochip
- Five open-source CPUs
- VexRiscv RV32IMAC+MMU @ 350MHz
- 4x PicoRV I/O Engine ("BIO") @ 700MHz
- 4MiB on-chip ROM ("RRAM")
- 2MiB on-chip SRAM
- Cryptographic accelerators, TRNG
- USB HS, camera, I2C, SPI, UART, etc.
Microcontroller comparison table: Dabao vs Raspberry Pi Pico 2, ESP32, Teensy 4.1, Adafruit Feather M4, BBC micro:bit v2
| Spec | Dabao | Raspberry Pi Pico 2 | ESP32-DevKitC | Teensy 4.1 | Adafruit Feather M4 | BBC micro:bit v2 |
|---|---|---|---|---|---|---|
| Manufacturer | Baochip | Raspberry Pi Ltd | Espressif Systems | PJRC | Adafruit | Micro:bit Educational Foundation |
| MCU / SoC | Baochip-1x (single-core Vexriscv) | RP2350 (dual-core Cortex-M33) | ESP32 (dual-core Xtensa LX6) | NXP iMXRT1062 (Cortex-M7) | SAMD51 (Cortex-M4F) | nRF52833 (Cortex-M4F) |
| Clock Speed | 350 MHz | 150 MHz | 240 MHz | 600 MHz | 120 MHz | 64 MHz |
| I/O Coprocessor | BIO (4× PicoRV @ 700 MHz) | 2× PIO blocks (8 state machines) | 2× ULP cores (RISC-V / FSM) | FlexIO | SERCOM | None |
| Hardware Security | Signed boot, TRNG, key store, one-way counters, RSA, ECC, ECDSA, X25519, SHA-256/512, SHA3, Blake2/3, AES; secure mesh, glitch sensors, ECC-protected RAM | TrustZone, signed boot, OTP key store, HW SHA-256, TRNG | eFuse secure boot + AES flash encryption, HW RNG | HAB secure boot, AES-256 encrypted XIP (lockable) | NVM read-back protection only | Read-back protection only; no HW crypto |
| IRIS Inspectable | Yes | No | No | No | No | No |
| Open Bootloader | Yes | Yes | No | No | No | No |
| Open RTL | Mostly open | No | No | No | No | No |
| Memory Protection | MMU | MPU + TrustZone | MPU-like | MPU | MPU | MPU |
| Swap Memory | Yes (Xous + external PSRAM) | No | No | No | No | No |
| Rust-native | Yes | No | No | No | No | No |
| RAM | 2048 KB + 256 KB I/O buffers | 520 KB | 520 KB | 1 MB | 192 KB | 128 KB |
| Flash | 4 MB (internal RRAM) | 4 MB | 4 MB | 8 MB + SD slot | 512 KB internal + 2 MB external | 512 KB internal |
| Flash Interface | Internal XIP (up to 1200 MB/s) | QSPI (~56 MB/s XIP) | QSPI (~40 MB/s) | FlexSPI octal/quad (~100 MB/s XIP) | Internal NVM (XIP est ~400 MB/s) | Internal NVM (est. 20–40 MB/s) |
| GPIO Pins | 20 | 26 | 34 | 55 | 20 | 5 large / 19 total |
| Wireless | None | None (W variant adds Wi-Fi/BT) | Wi-Fi + Bluetooth 4.2 | None (add-on available) | None (Wing ecosystem) | Bluetooth 5.0 + 2.4 GHz |
| USB | USB-C (USB 2.0 HS device) | Micro-USB (native) | Micro-USB (via CP2102) | USB-C (native, device + host) | Micro-USB | Micro-USB |
| Price (approx.) | $12 | $5–$7 | $8–$12 | $30–$35 | $20–$24 | $15–$18 |
| Best For | Security, high-assurance & general-purpose | General-purpose, MicroPython/C++ | IoT projects, wireless connectivity | Audio DSP, high-speed data, USB MIDI/HID | CircuitPython, modular add-on Wings | Education, kids, classroom coding |
Sources:
[1] Pico 2 datasheet · RP2350 datasheet · Bootrom source
[2] DevKitC user guide · ESP32 datasheet
[3] Teensy 4.1 product page · iMXRT1062 datasheet
[4] Feather M4 guide · SAMD51 datasheet
[5] micro:bit hardware spec · nRF52833 product spec
[1] Pico 2 datasheet · RP2350 datasheet · Bootrom source
[2] DevKitC user guide · ESP32 datasheet
[3] Teensy 4.1 product page · iMXRT1062 datasheet
[4] Feather M4 guide · SAMD51 datasheet
[5] micro:bit hardware spec · nRF52833 product spec
IRIS Inspectable
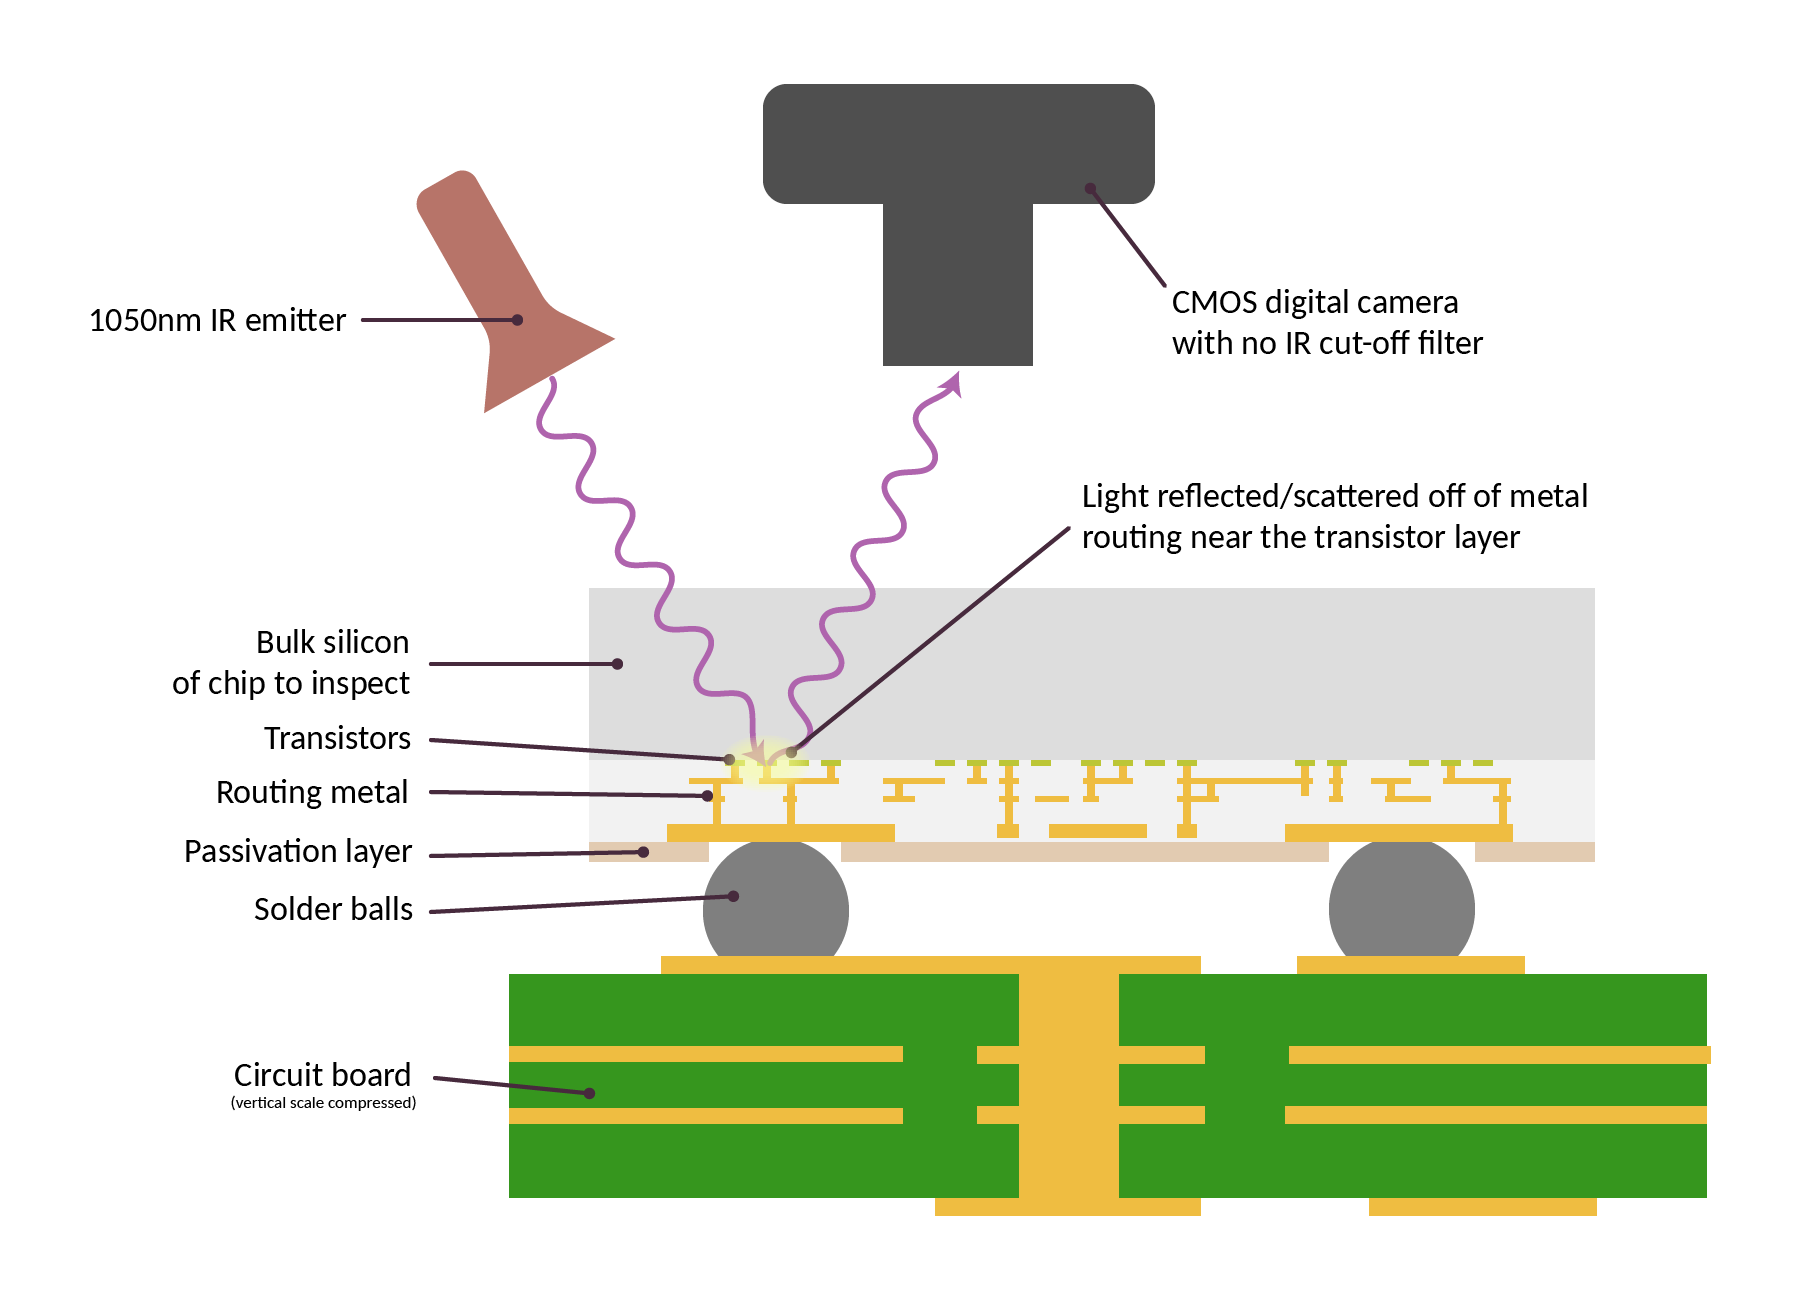
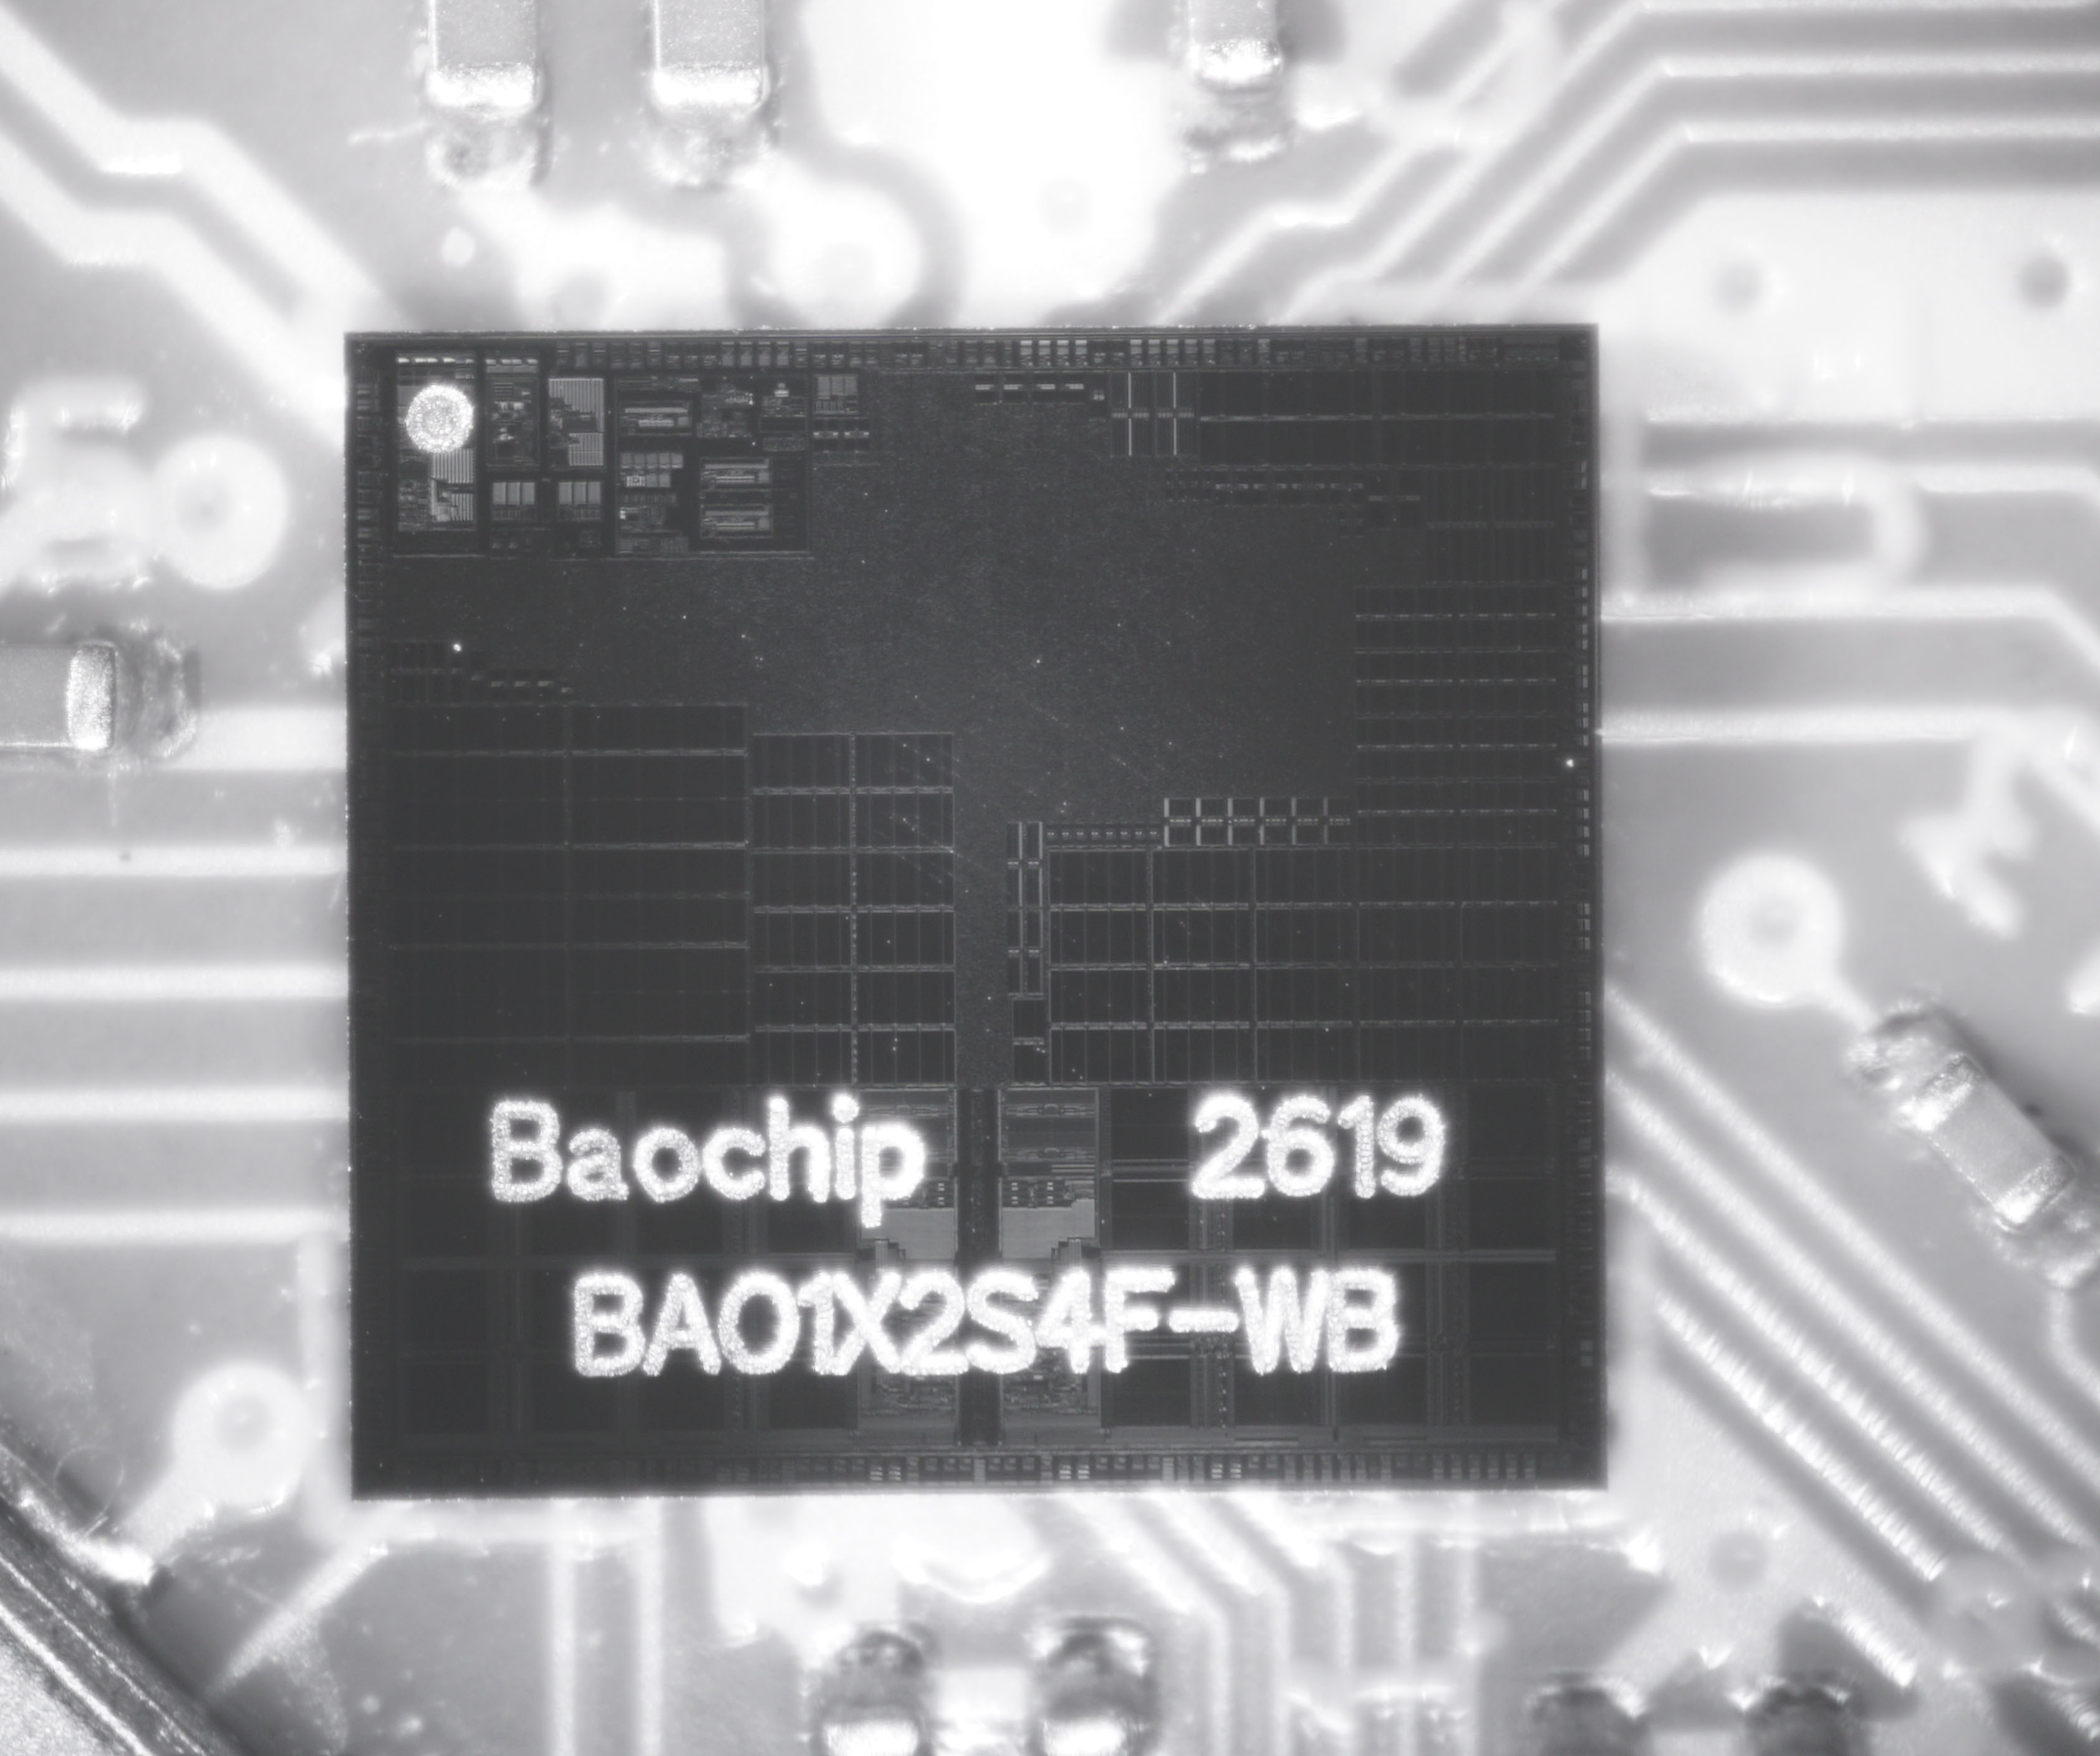
IRIS Makes it Harder to Fake Chips

BIO Gives Flexible I/O
- BIO: Bao-I/O protocol emulator
- Any protocol <25MHz toggle rate
- CAN
- LED strips
- USB full speed
- I2C, UART, SPI, etc...
- That weird air conditioner IR protocol...
- Open source and patent-free!
- Similar to Raspberry Pi PIO but open source
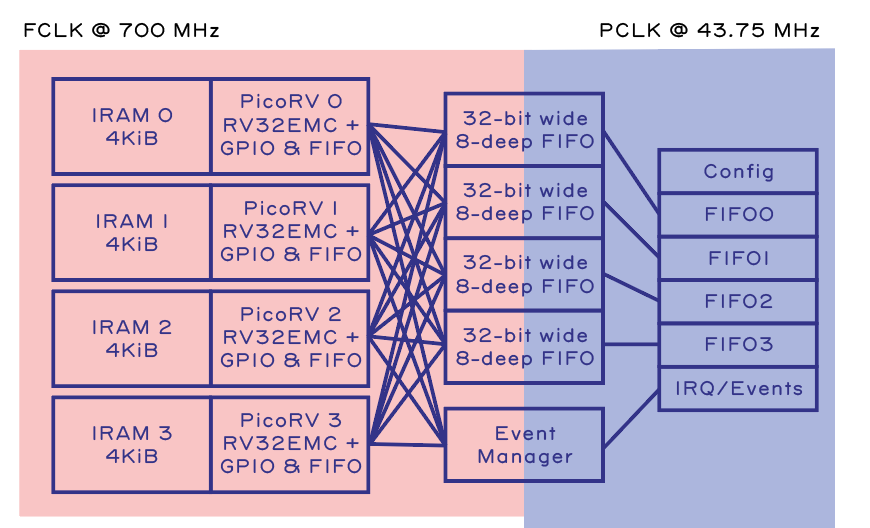
How it Works: BIO Architecture
- Imagine a RISC-V CPU...
- The lower 16 registers are "normal"
- The upper 16 registers are "hardware functions"
- Set/get GPIO, pin directions
- Event management
- Between-CPU communication & synchronization

Example: "Blink" an LED
#include <stdint.h>

#include "bio.h" // this must always be first

#define GPIO_PIN 21

void main(void) {
    uint32_t output_mask = 1 << GPIO_PIN;

    set_gpio_mask(output_mask);
    set_output_pins(output_mask);

    clear_gpio_pins_n(!output_mask); // drives it low
    while (1) {
        for(int i = 0; i < 10; i++) {
            set_gpio_pins(output_mask);
        }
        for(int i = 0; i < 10; i++) {
            clear_gpio_pins_n(!output_mask); // drives the pin low
        }
    }
}
"Blink" an LED: Setting the GPIO
Multicore Operation
// Runs on Core 0
void main(void) {
    uint32_t tx = 0;
    uint32_t rx;
    while(1) {
        push_fifo1(tx);
        rx = pop_fifo0();
        tx = rx + 1;
    }
}

// Runs on Core 1
void main(void) {
    uint32_t rx;
    while(1) {
        rx = pop_fifo1();
        push_fifo0(rx + 1);
    }
}
In Depth: Send Data Between CPU0 and CPU1
Try the BIO
- See BIO-sim repository for more details
- https://github.com/baochip/bio-sim
How Baochip Came About
The Landscape of Open Source Silicon
- PDK vs RTL
- PDK (process design kit)
- Describes the physical transistors and wires
- Difficult to open-source because of foundry trade secrets
- Only older nodes (130nm, 180nm) are open PDK - others are closed (for now)
- RTL (Register Transfer Level)
- Hardware described in code
- Verilog, VHDL, etc.
- We can open source the RTL that we design
- We can choose open architectures for our CPUs
- We can start building the software today that will eventually run on the fully-open hardware stack!
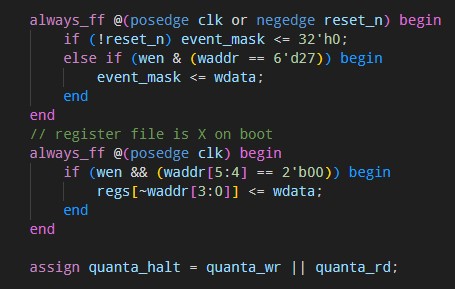
- Example of RTL
Problem: Chips are Expensive
Cost of tools to...

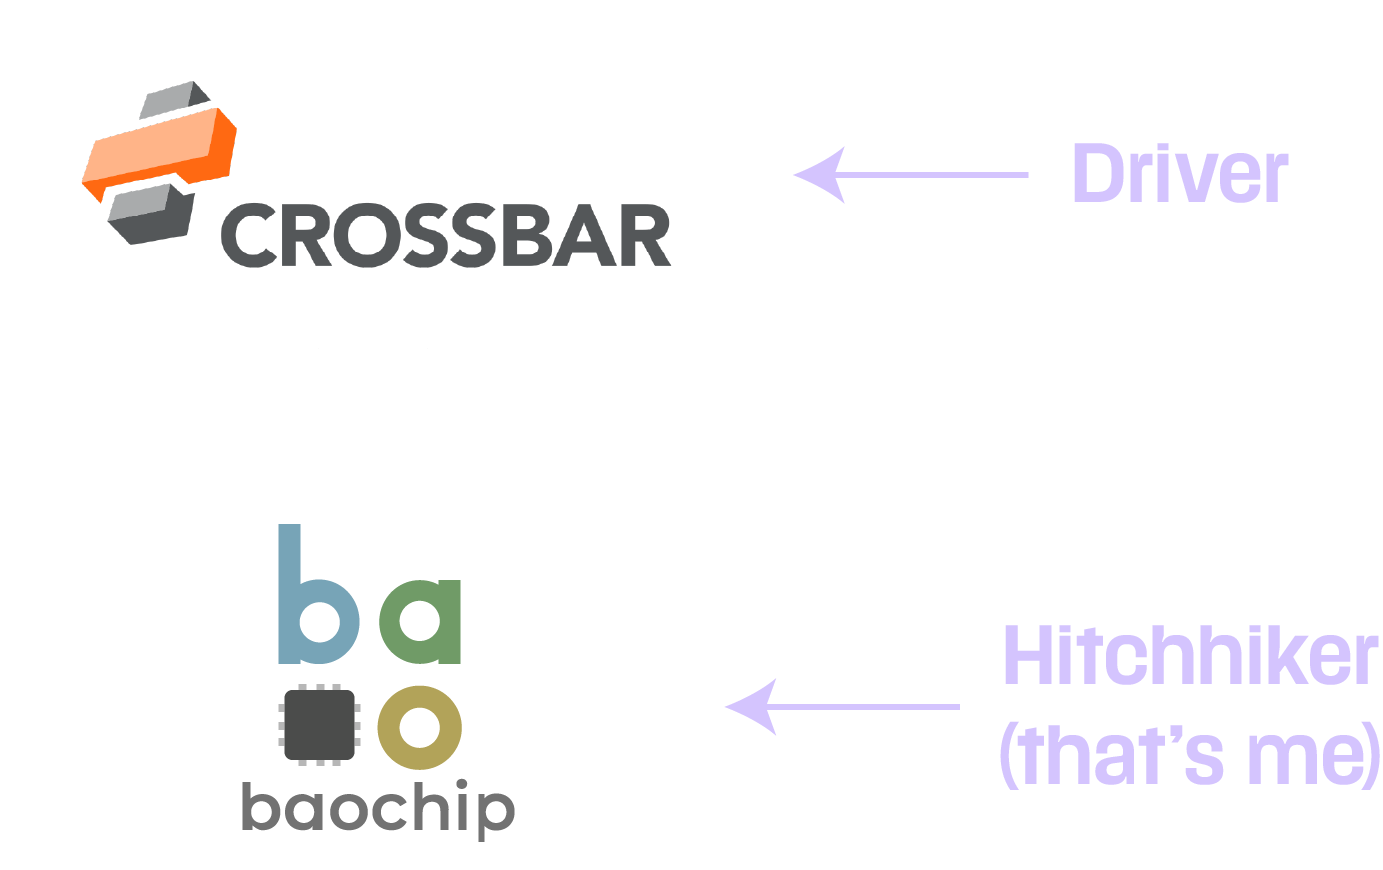
Strategy:
"Hitchhike" Open Source Cores
on a Commercial Tape-Out
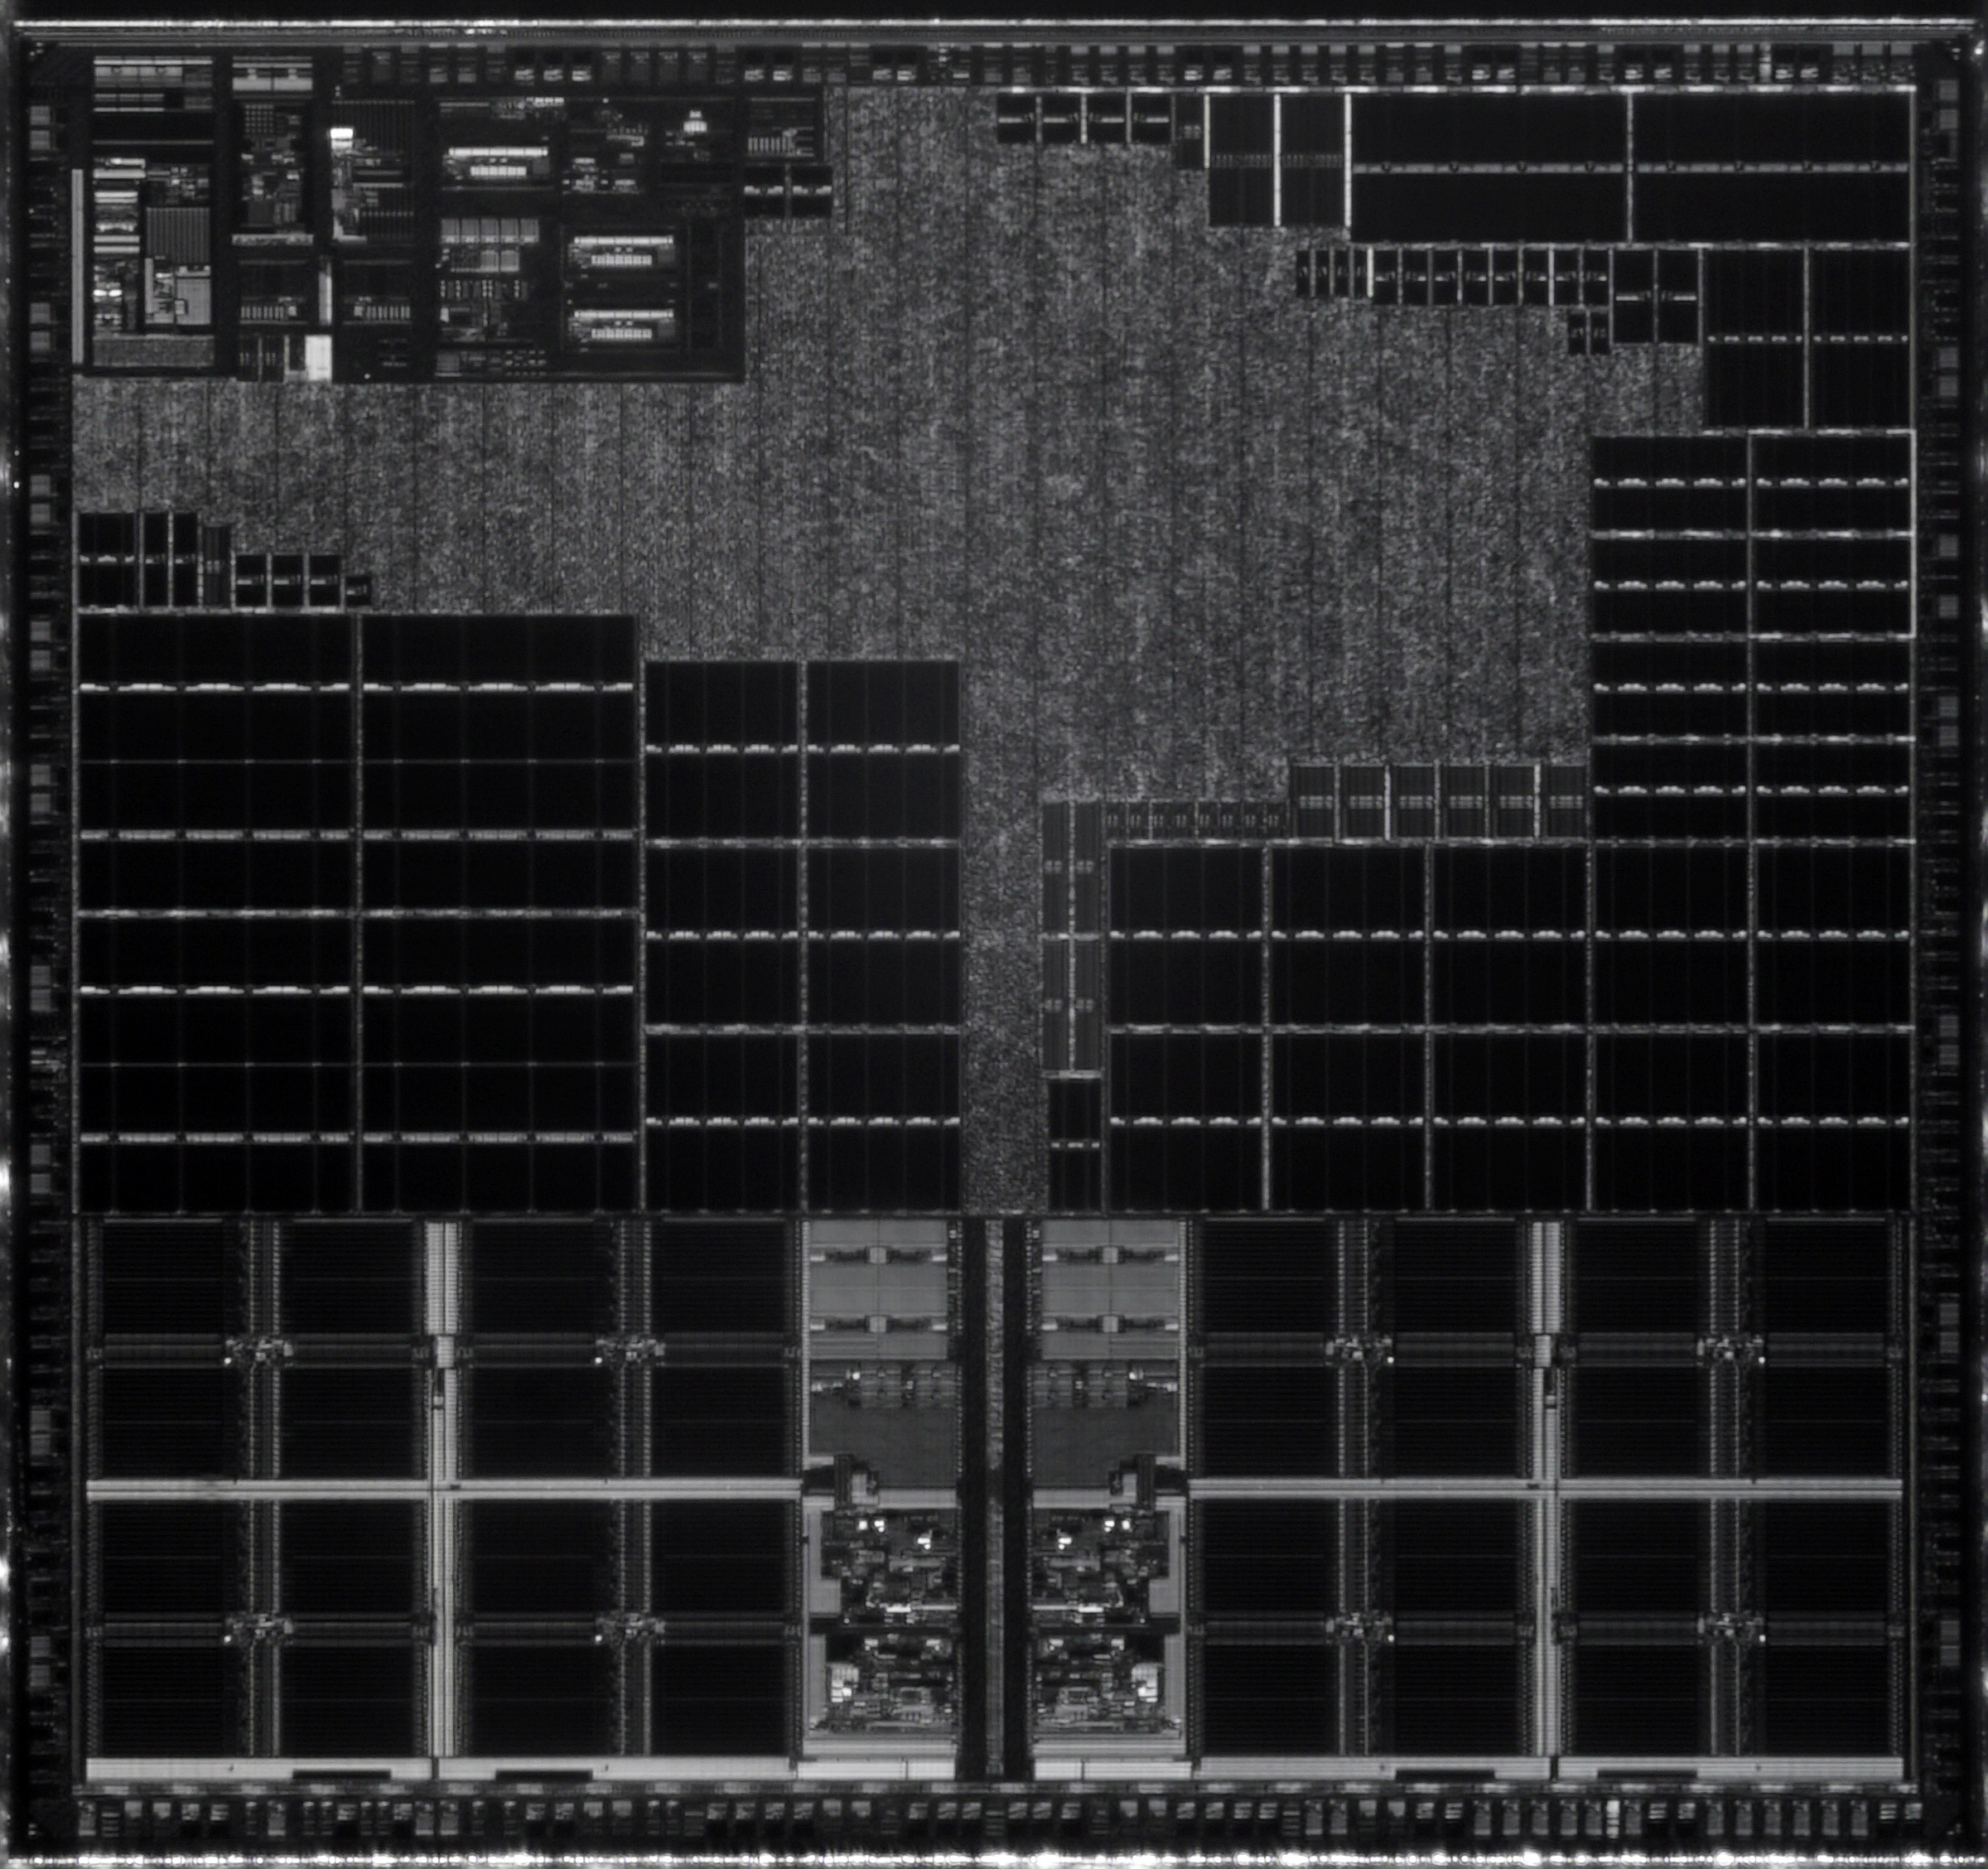
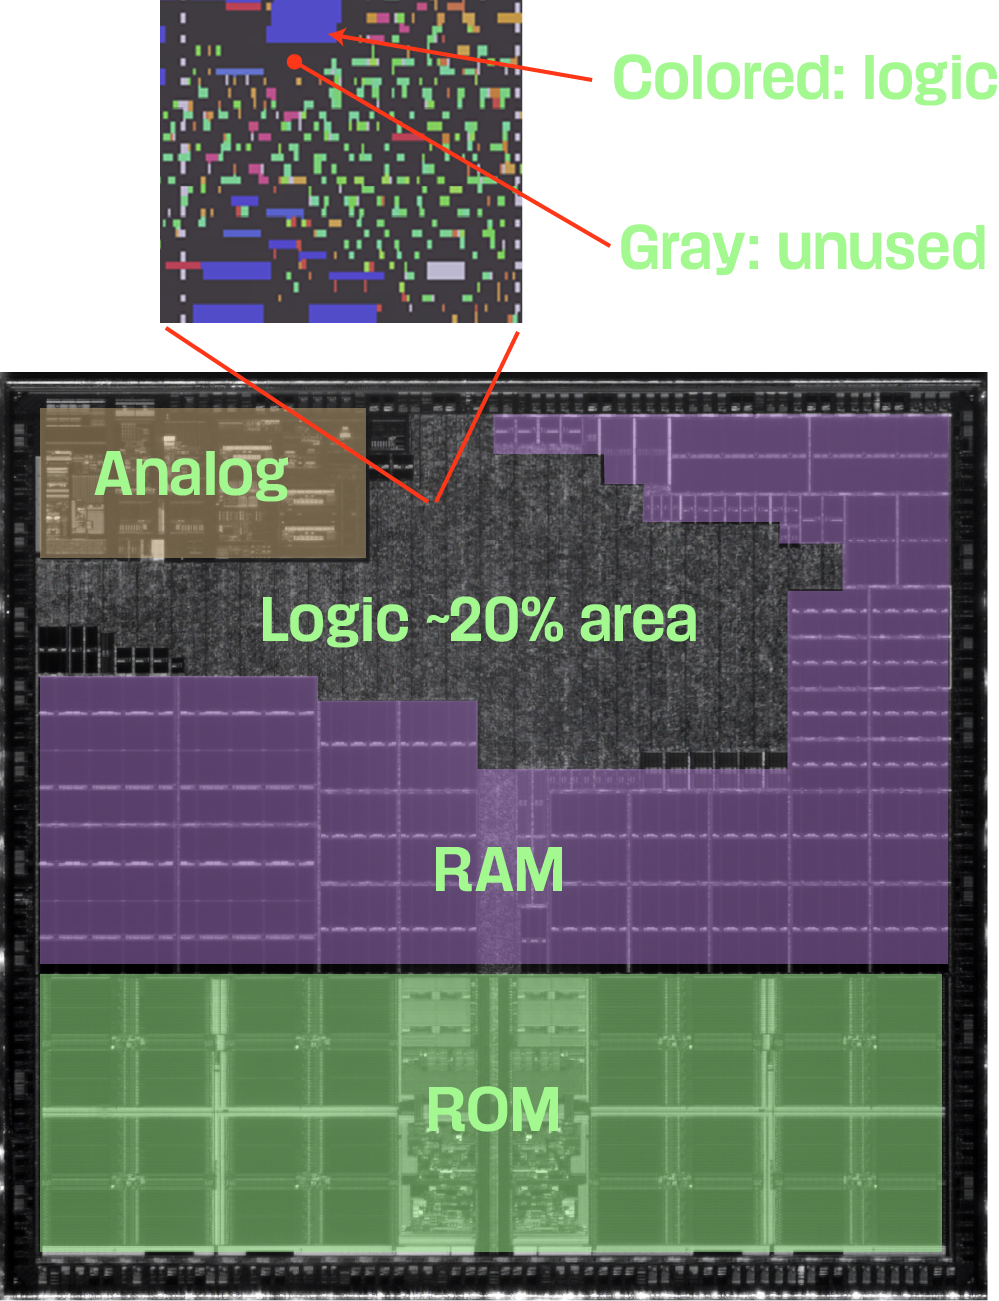
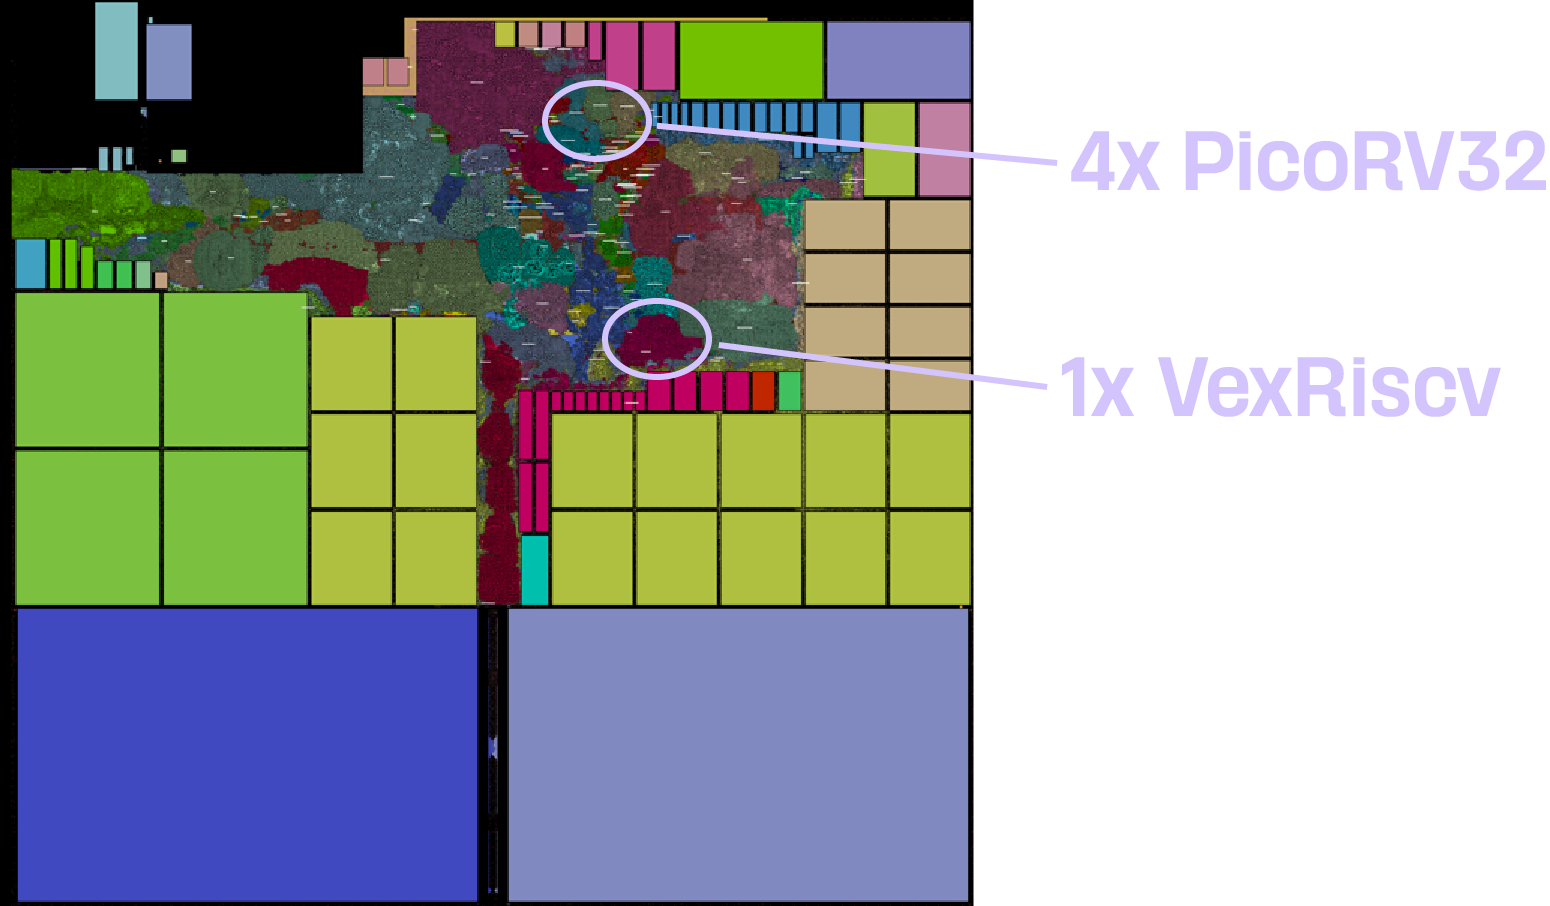
Review: Logic Density in Small-Node Chips
- Size of chip is set primarily by:
- Memory
- I/O perimeter
- Logic is like a "gas",
it expands to fill the available space - At a detail level, it can be quite sparse
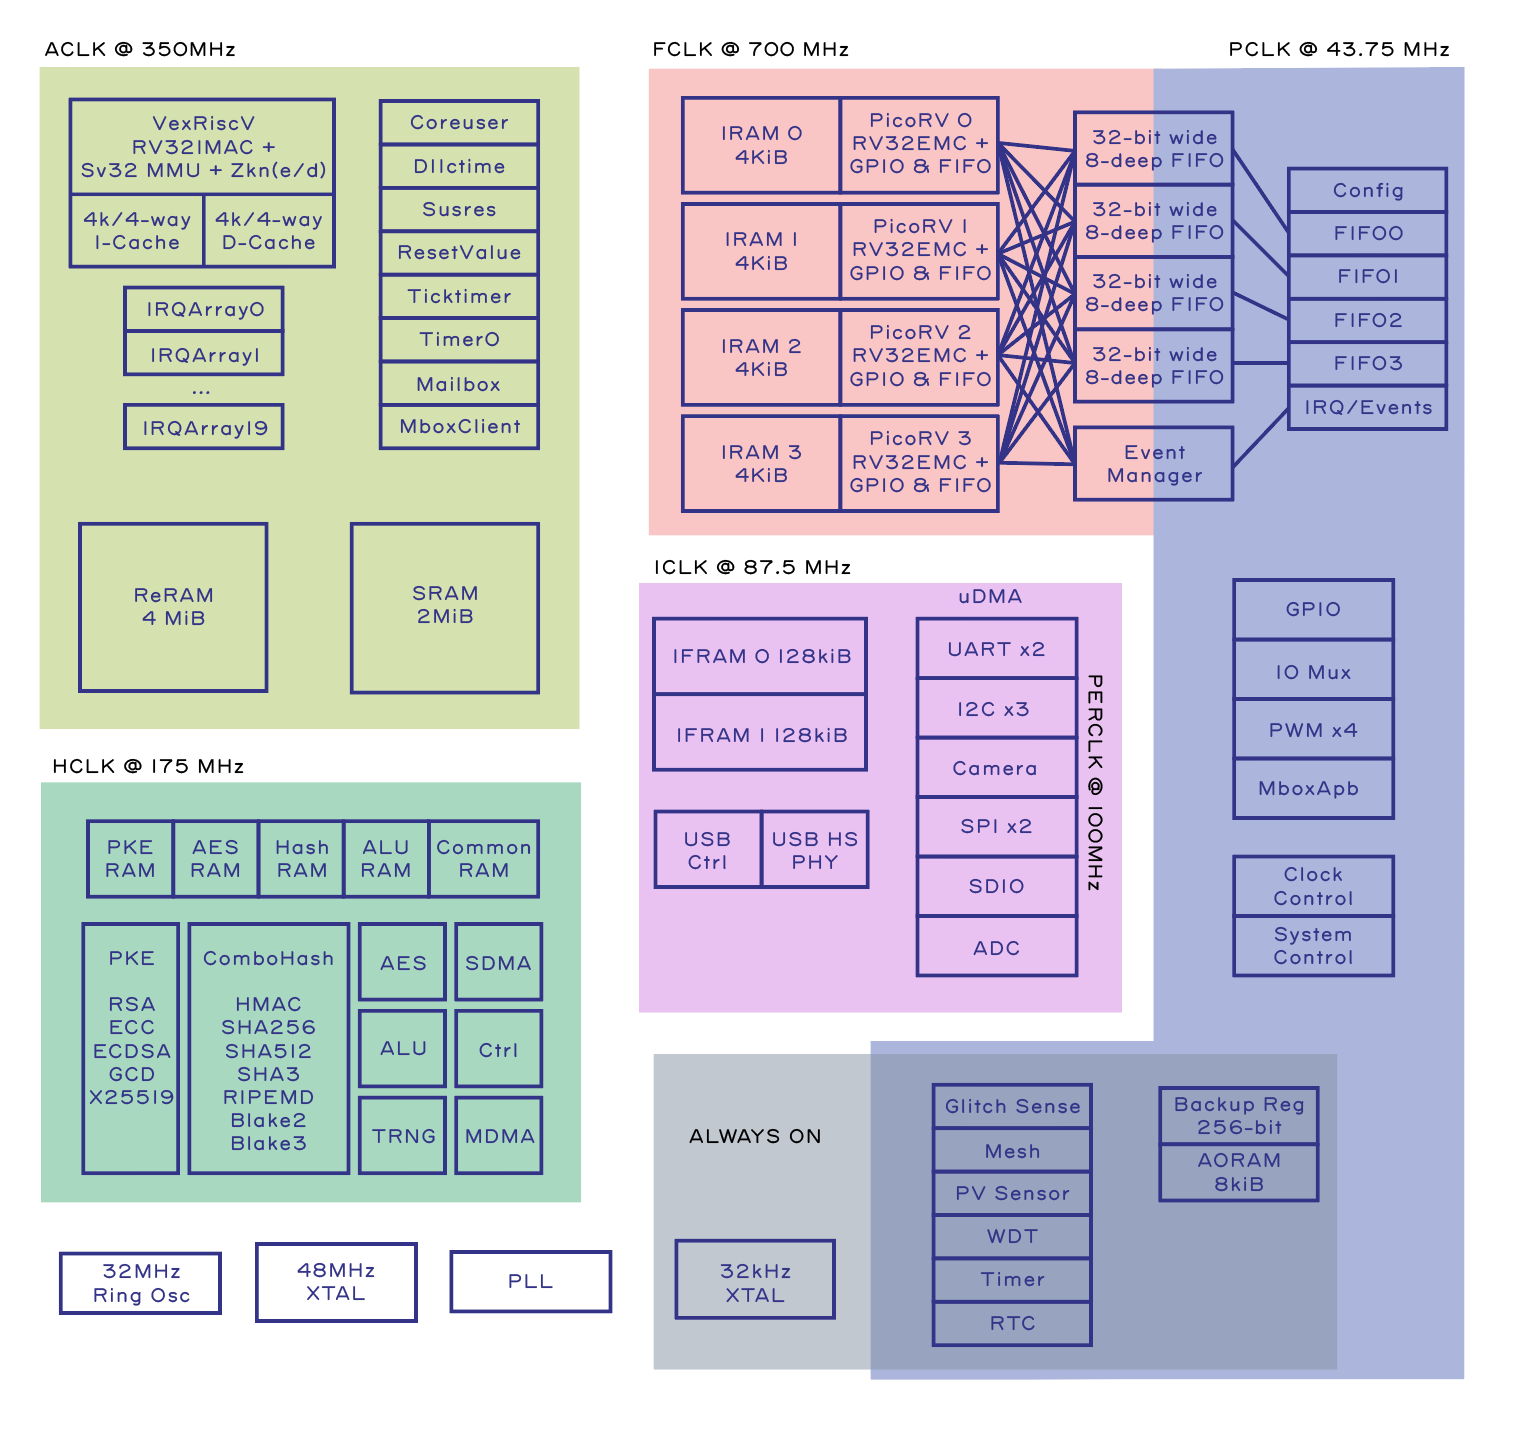
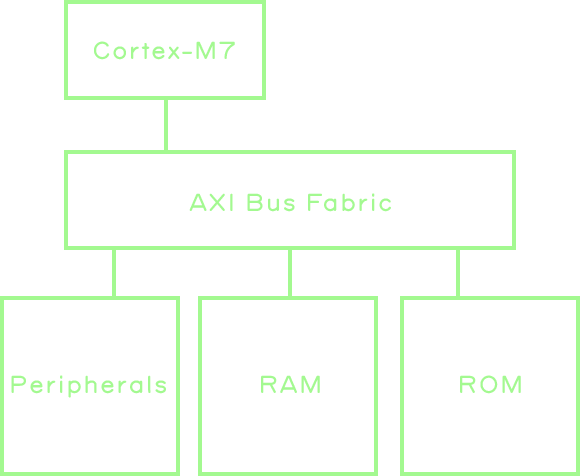
Review: Typical SoC Block Diagram
Can We...Just Add a RISC-V Core?
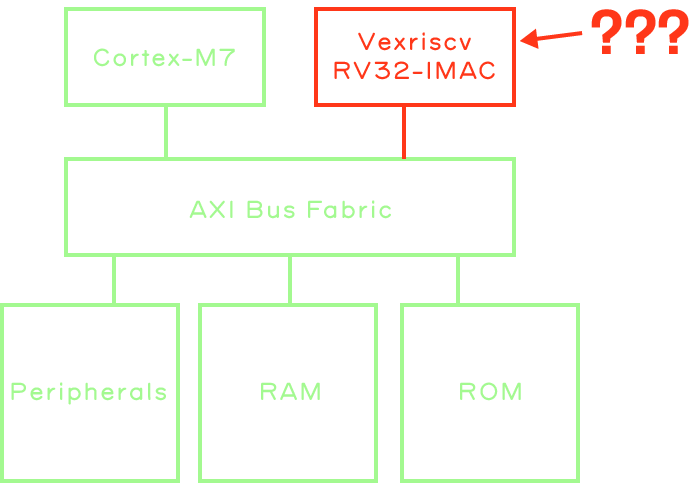
Yes We Can, and It's "Free"!
- <2% die area
- 1x VexRiscv with MMU
- 4x PicoRV
- No extra cost to tape-out
- Logic is sparse
- Could fit more logic!
- No royalty
Okay, So...Hitchhiking is Theoretically Possible But...
But Who Would Give THIS Guy A Ride?

Fig 1. "Trouble"
Luckily, Crossbar was already heading that way,
and they stopped and asked me for
directions...
Result: Baochip-1x Partially-Open RTL SoC
For High Assurance Applications
Introducing Dabao
Dabao: Baochip-1x Evaluation Board
- "Simplest Board"
- 2-layer PCB
- JLCPCB-compatible
- Not all I/O routed to pins
- Baochip-1x CSP package is too dense
- Subset of routable I/O available
- Includes local voltage regulators
- Source: https://github.com/baochip/dabao
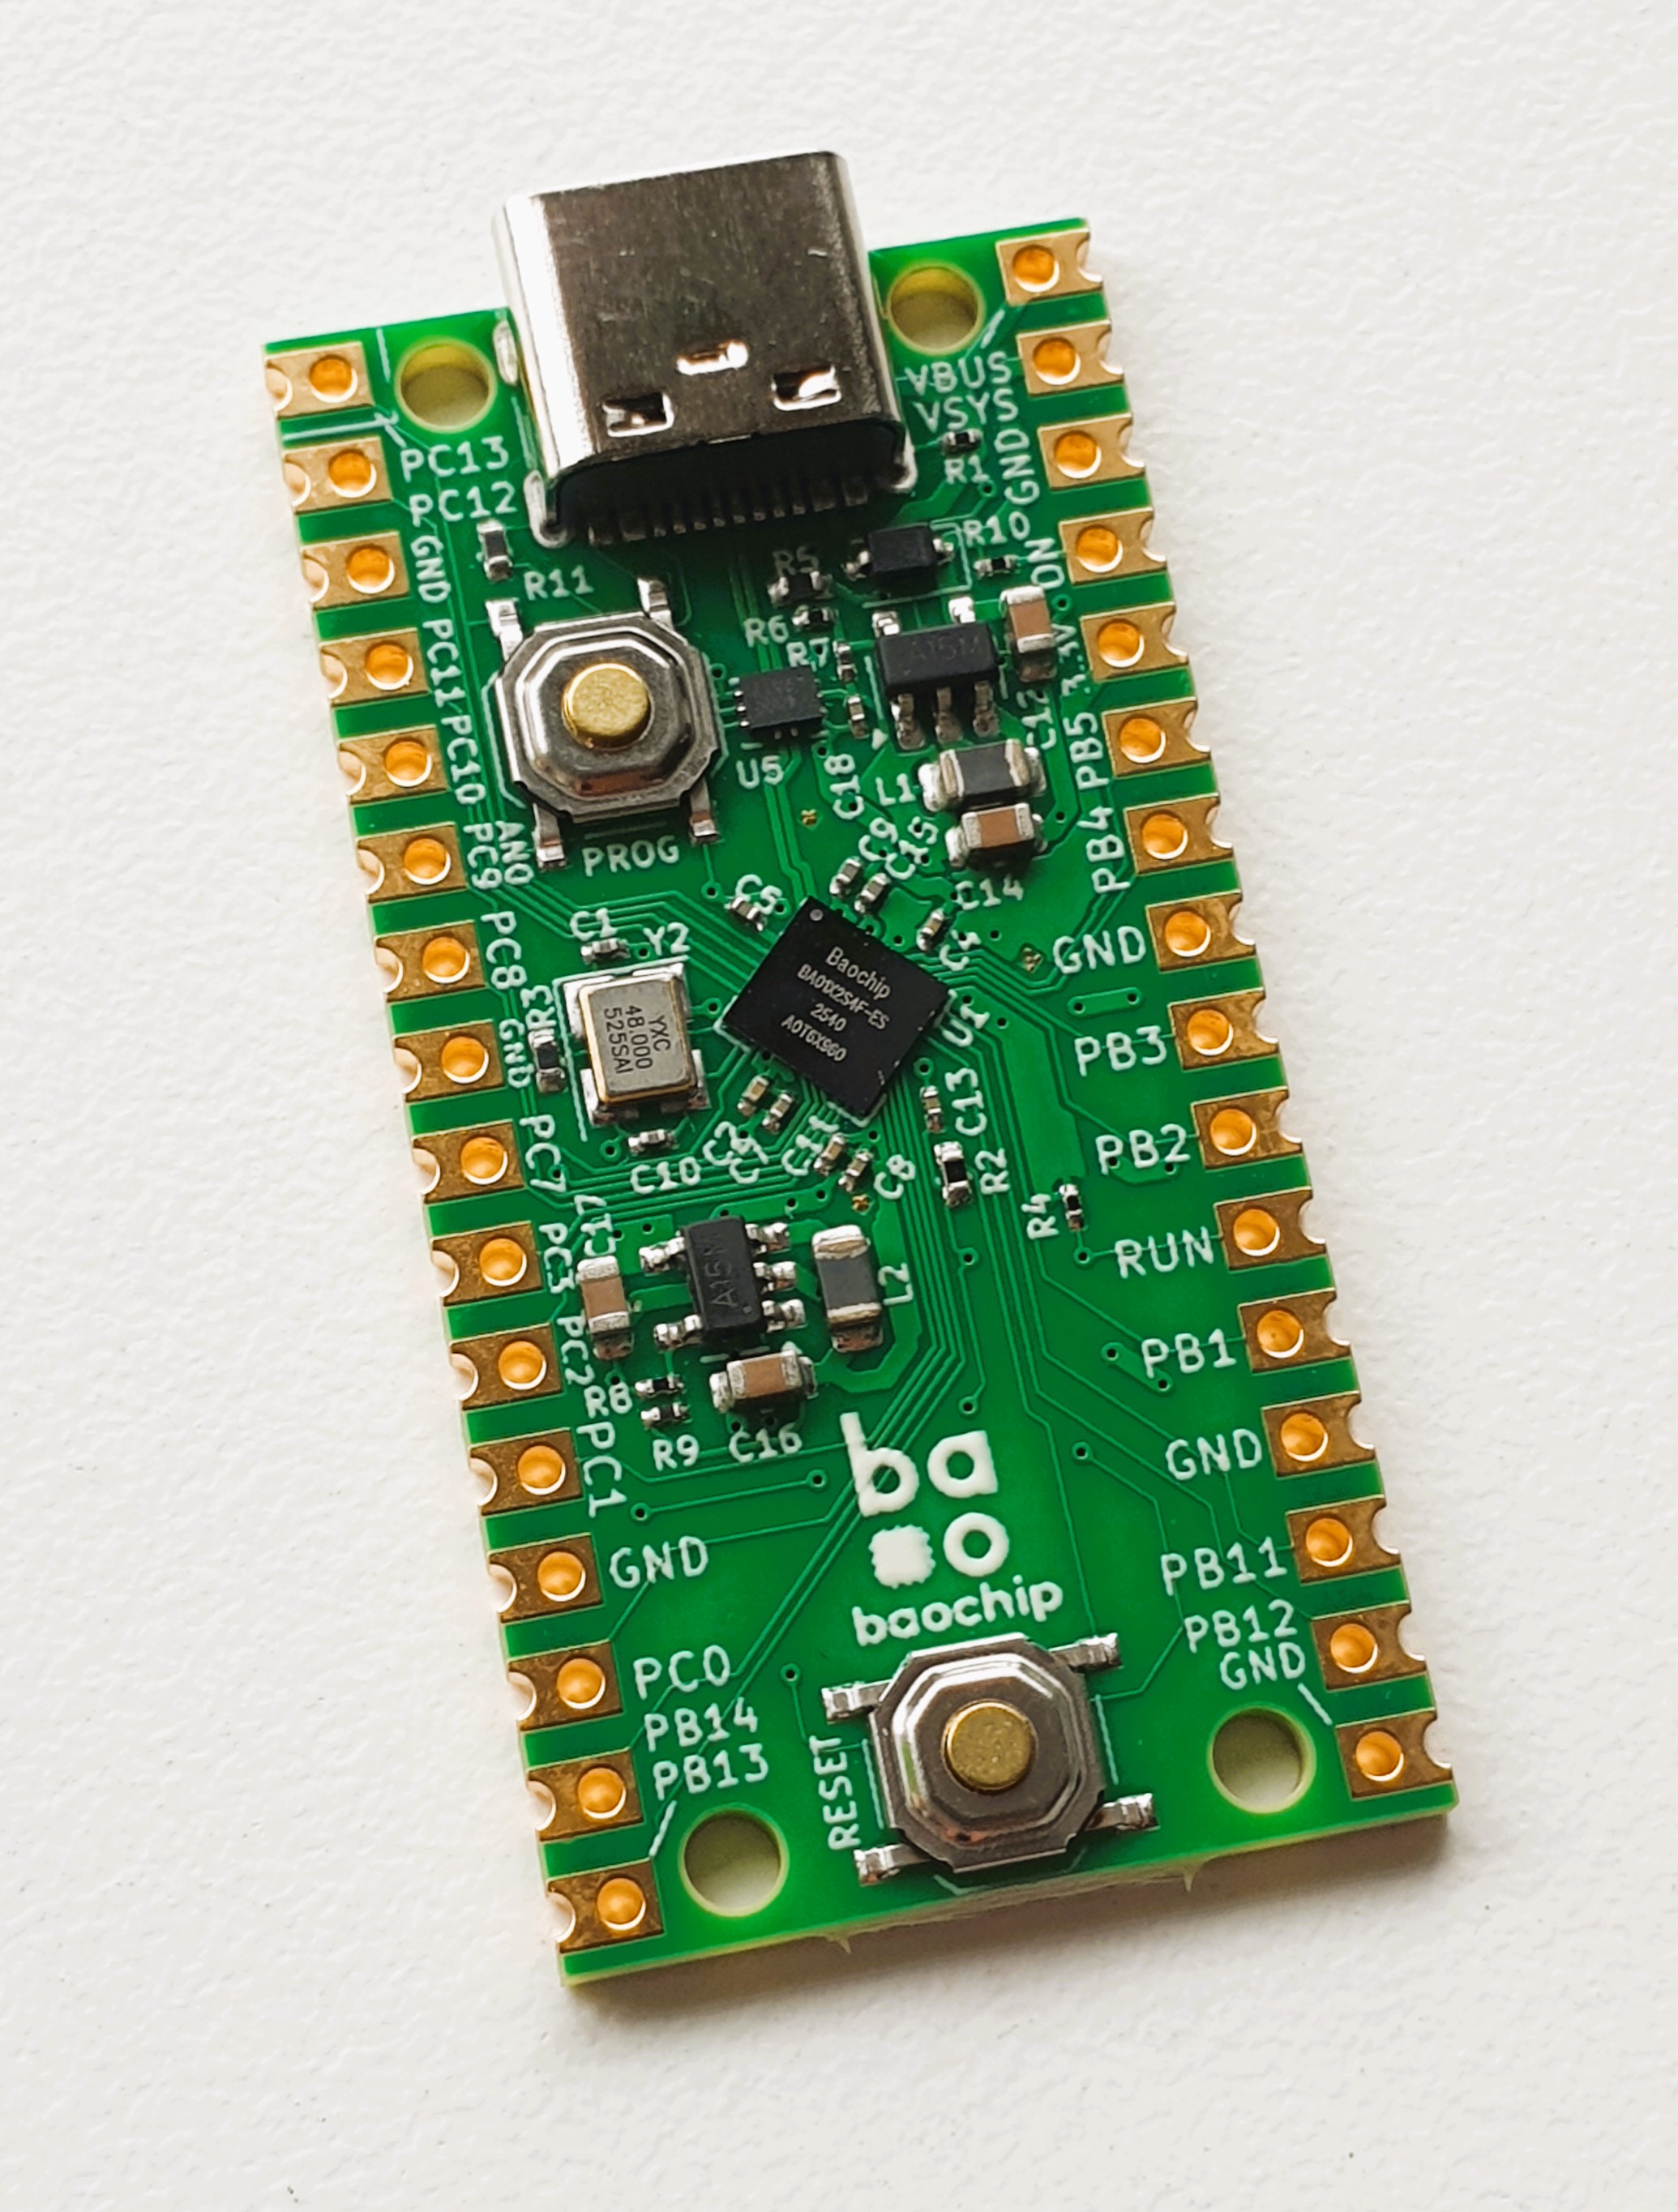
Dabao Pinout
Dabao Availability
- First shipments in June 2026 to CrowdSupply "early access" backers
- General availability targeted for December 2026
- Long wait: foundry is "fully booked" with AI Orders
A Brief Introduction to Xous, the Baochip OS
Xous: A Pure-Rust OS For Baochip-1x
- Written from the ground-up in Rust
- Uses virtual memory (like your desktop OS) thanks to MMU
- Message passing between processes
- Source: https://github.com/betrusted-io/xous-core/
git clone --depth 1 https://github.com/betrusted-io/xous-core/ cd xous-core git fetch --depth 1 origin tag v0.10.1 - Requires Rust toolchain
- If already installed, run "
rustup update" to ensure it is recent
- If already installed, run "
- Supports multiple targets, build for dabao with
cargo xtask dabao dabao-console
Xous Code Organization

Xous is a Message Passing OS
- Every process runs in an isolated, virtual memory space
- Messages must "bounce off" the kernel to be routed to its destination
- In this example:
- The "console" process sends a log message to "log" via the kernel
- The log receives the message
- It routes the log message to the USB interface
- (Not shown: it also routes it to the hardware serial interface)

Thank you!
bunnie | masto: @bunnie@treehouse.systems | bluesky: @bunnie.org
baochip | bluesky: @baochip.com
Join our Discord:
Backup slides
Developer Experience: Blink an LED
- Add a "blink" command to the shell
- Connect to the IO service on the HAL
- Set up a pin
- Loop while changing the pin value
Shell Overview
- Shell is located in "dabao-console"
- Shell has a REPL (Read-Eval-Print-Loop) which takes commands and dispatches them to "command modules"
- This is an example of the "ver" command module
impl<'a> ShellCmdApi<'a> for Ver {
    cmd_api!(ver);

    fn process(&mut self, args: String, env: &mut CommonEnv) ->
		Result<Option<String>, xous::Error> {
        use core::fmt::Write;
        let mut ret = String::new();
        let helpstring = "ver [xous]";

        let mut tokens = args.split(' ');

        if let Some(sub_cmd) = tokens.next() {
            match sub_cmd {
                "xous" => {
                    write!(ret, "Xous version: {}", env.ticktimer.get_version()).unwrap();
                    log::info!("VER.XOUS,{}", env.ticktimer.get_version());
                }
                _ => {
                    write!(ret, "{}", helpstring).unwrap();
                }
            }
        } else {
            write!(ret, "{}", helpstring).unwrap();
        }
        Ok(Some(ret))
    }
}
Blink command: Add the Sub-Command
- Add a "blink" command to the "test.rs" module
- Insert the blink code in apps-dabao/dabao-console/src/cmds/test.rs around Line 24
    fn process(&mut self, args: String, _env: &mut CommonEnv) -> Result<Option<String>, xous::Error> {
        use core::fmt::Write;
        let mut ret = String::new();

        #[allow(unused_variables)]
        let helpstring = "test [proc] [freemem] [interrupts] [panic] [env]";

        let mut tokens = args.split(' ');

        if let Some(sub_cmd) = tokens.next() {
            match sub_cmd {
                "blink" => {
                    log::info!("Add blinky code here");
                }
Test the Command Extension
Using the vscode extension:
- Click "Build-flash-monitor"
- If doing this the first time, follow the instructions to find the Dabao disk and serial port locations
- Set baochip location
- Set bootloader mode serial port
- Press build-flash-monitor
- Set run mode serial port
- You may have to select "monitor" again
- Type "test blink" on the "[console]" prompt
[console]

[console] test blink
INFO:dabao_console::cmds::test: Add blinky code here (apps-dabao\dabao-console\src\cmds\test.rs:25)
Blink command: Add the Blink
- Create the "IoxHal" object
- Configure the port and direction
- PB4 allows us to put a simple LED between PB4 and the adjacent ground pin
- Create a loop:
- Set the pin to high
- Wait 1 second
- Set the pin to low
- Wait 1 second
- Build-flash-monitor
                "blink" => {
                    use std::time::Duration;

                    use bao1x_api::{IoGpio, IoxDir, IoxHal, IoxPort, IoxValue};
                    let iox = IoxHal::new();
                    iox.set_gpio_pin_dir(IoxPort::PB, 4, IoxDir::Output);
                    loop {
                        iox.set_gpio_pin_value(IoxPort::PB, 4, IoxValue::High);
                        std::thread::sleep(Duration::from_secs(1));
                        iox.set_gpio_pin_value(IoxPort::PB, 4, IoxValue::Low);
                        std::thread::sleep(Duration::from_secs(1));
                    }
                }